As sensitive data, like personally identifiable information (PII) and protected health information (PHI), becomes more widely used across industries, it is incumbent upon data teams to have mechanisms in place to protect it. Snowflake’s Column-level Security capability enables dynamic data masking of this type of sensitive data through policies that are applied at query time to mask plain-text data in the table and view columns. How the data appears to users is based on the policy conditions, SQL execution context, and role entitlements.
Immuta’s native integration with Snowflake also enables dynamic data masking, but takes an automated, attribute-based approach to data policy enforcement. In this blog, we’ll walk through two ways to implement and scale Snowflake column-level security policies. The first shows how to mask PII using Snowflake’s built-in role-based controls, and the second demonstrates how to do the same task with Snowflake’s Immuta integration using attribute-based access control.
See steps 1-7 with native Snowflake controls, or jump to the single ABAC policy approach with Immuta.
Scenario: Masking Snowflake Customer Data Labeled PII
In this scenario, we have sensitive customer and cell center data that must be masked for all users, except those with an override authorization. We’ll walk through an example in which there are four Snowflake users in the company’s central office, but only two are authorized to see the unmasked data.
Note: the tables used are from the TPC-DS sample data available from Snowflake.
Creating Column-Level Masking Policies for PII in Snowflake
Snowflake’s TPC-DS sample data is housed in the SNOWFLAKE_SAMPLE_DATA shared database. However, that default database cannot be used to apply masking policies. Therefore, in this scenario, the first step in masking data labeled PII using native Snowflake data governance capabilities is to create a new database.
1. Create Masking Policies
First, we’ll create the policy PII_N_NULLIFY to mask Number to null.
USE ROLE ACCOUNTADMIN;
    USE TPCDS_DB;
    CREATE OR REPLACE MASKING POLICY TPCDS_SF10TCL.PII_N_NULLIFY AS
    (VAL NUMBER) RETURNS NUMBER -> CASE WHEN INVOKER_ROLE() IN (‘CENTRAL_OFFICE_ADMIN’) THEN VAL ELSE NULL
    END;
Next, we’ll create a similar policy, PII_C_NULLIFY, to mask VARCHAR to null.
CREATE OR REPLACE MASKING POLICY TPCDS_SF10TCL.PII_C_NULLIFY AS
    (VAL VARCHAR) RETURNS VARCHAR -> CASE WHEN INVOKER_ROLE() IN
    (‘CENTRAL_OFFICE_ADMIN’) THEN VAL ELSE NULL
    END;
2. Apply Masking Policies to CUSTOMER table
Once the policies are built, we can enforce them on our customer table so that personal information, like names, email addresses, and birthdays, are masked.
USE ROLE ACCOUNTADMIN;
    USE TPCDS_DB;
    ALTER TABLE TPCDS_SF10TCL.customer MODIFY COLUMN c_first_name SET MASKING POLICY TPCDS_SF10TCL.PII_C_NULLIFY;
    ALTER TABLE TPCDS_SF10TCL.customer MODIFY COLUMN c_last_name SET MASKING POLICY TPCDS_SF10TCL.PII_C_NULLIFY;
    ALTER TABLE TPCDS_SF10TCL.customer MODIFY COLUMN c_login SET MASKING POLICY TPCDS_SF10TCL.PII_C_NULLIFY;
    ALTER TABLE TPCDS_SF10TCL.customer MODIFY COLUMN c_customer_id SET MASKING POLICY TPCDS_SF10TCL.PII_C_NULLIFY;
    ALTER TABLE TPCDS_SF10TCL.customer MODIFY COLUMN c_email_address SET MASKING POLICY TPCDS_SF10TCL.PII_C_NULLIFY;
    ALTER TABLE TPCDS_SF10TCL.customer MODIFY COLUMN c_birth_day SET MASKING POLICY TPCDS_SF10TCL.PII_N_NULLIFY;
    ALTER TABLE TPCDS_SF10TCL.customer MODIFY COLUMN c_birth_month SET MASKING POLICY TPCDS_SF10TCL.PII_N_NULLIFY;
    ALTER TABLE TPCDS_SF10TCL.customer MODIFY COLUMN c_birth_year SET MASKING POLICY TPCDS_SF10TCL.PII_N_NULLIFY;
The following columns are tagged in the Customer table as PII_N_NULLIFY or PII_C_NULLIFY:
| Table | Column |
|---|---|
| customer | c_first_name |
| customer | c_last_name |
| customer | c_login |
| customer | c_customer_id |
| customer | c_email_address |
| customer | c_birth_day |
| customer | c_birth_month |
| customer | c_birth_year |
When we run the following command, the results in the columns above will be nulled.
select c_first_name,c_last_name,c_login,c_customer_id,c_email_address,c_birth_day,
c_birth_month,c_birth_year,*from TPCDS_SF10TCL.customer limit 3;

3. Apply Masking Policies to CALL_CENTER table
Next, we’ll repeat the same process for the call center table, so that employees’ and managers’ names are masked.
ALTER TABLE TPCDS_SF10TCL.call_center MODIFY COLUMN cc_name SET MASKING POLICY TPCDS_SF10TCL.PII_C_NULLIFY;
ALTER TABLE TPCDS_SF10TCL.call_center MODIFY COLUMN cc_employees SET MASKING POLICY TPCDS_SF10TCL.PII_N_NULLIFY;
ALTER TABLE TPCDS_SF10TCL.call_center MODIFY COLUMN cc_manager SET MASKING POLICY TPCDS_SF10TCL.PII_C_NULLIFY;
ALTER TABLE TPCDS_SF10TCL.call_center MODIFY COLUMN cc_market_manager SET MASKING POLICY TPCDS_SF10TCL.PII_C_NULLIFY;
The following columns are tagged in call_center table as PII_N_NULLIFY or PII_C_NULLIFY:
| Table | Column |
|---|---|
| call_center | cc_name |
| call_center | cc_employees |
| call_center | cc_manager |
| call_center | cc_market_manager |
When we run the following command, the results in the columns above will be nulled.
select cc_name,cc_employees,cc_manager,cc_market_manager,* from TPCDS_SF10TCL.call_center limit 3;

4. Create CENTRAL_OFFICE_ADMIN role and Grant Usage
Since we want some employees in the central office to have admin access to this data, we must create a new role to grant access to the database.
 CREATE ROLE IF NOT EXISTS CENTRAL_OFFICE_ADMIN;

    GRANT ALL PRIVILEGES on database TPCDS_DB TO ROLE CENTRAL_OFFICE_ADMIN;
    GRANT ALL PRIVILEGES on SCHEMA TPCDS_SF10TCL TO ROLE CENTRAL_OFFICE_ADMIN;
    GRANT select on all tables in schema TPCDS_DB.TPCDS_SF10TCL to role CENTRAL_OFFICE_ADMIN;
5. Create Two Users *_a for Authorized Users and Two Users *_e for Unauthorized Users
In this scenario, we have four users in the central office, but only two should be allowed to access the unmasked data. Therefore, we’ll create the user roles for each of the four users with their corresponding permission levels, add them to the central office role, and finally add the two users with authorization to see unmasked data to the admin role.
CREATE OR REPLACE USER john_a PASSWORD = 'pwd123' MUST_CHANGE_PASSWORD = FALSE;
    CREATE OR REPLACE USER jane_a PASSWORD = 'pwd123' MUST_CHANGE_PASSWORD = FALSE;
    CREATE OR REPLACE USER jeff_e PASSWORD = 'pwd123' MUST_CHANGE_PASSWORD = FALSE;
    CREATE OR REPLACE USER bill_e PASSWORD = 'pwd123' MUST_CHANGE_PASSWORD = FALSE;

   --Grant 4 new users to 'CENTRAL_OFFICE' role
    CREATE ROLE IF NOT EXISTS CENTRAL_OFFICE;
    GRANT ROLE CENTRAL_OFFICE TO USER john_a;
    GRANT ROLE CENTRAL_OFFICE TO USER jane_a;
    GRANT ROLE CENTRAL_OFFICE TO USER jeff_e;
    GRANT ROLE CENTRAL_OFFICE TO USER bill_e;

   --Grant 2 new users to 'CENTRAL_OFFICE_ADMIN' role
    GRANT ROLE CENTRAL_OFFICE_ADMIN TO USER john_a;
    GRANT ROLE CENTRAL_OFFICE_ADMIN TO USER jane_a;
6. View Two Authorized Users (CENTRAL_OFFICE_ADMIN role) Who See Unmasked Data
To verify that our authorized users, John and Jane, are able to see unmasked data, we’ll log in and run a query under their permissions. After logging in as JOHN_A, we’ll click on Worksheets and run the following SQL statements:
USE ROLE CENTRAL_OFFICE;
USE TPCDS_DB;
USE SCHEMA TPCDS_SF10TCL;
select c_first_name,c_last_name,c_login,c_customer_id,c_email_address,c_birth_day,c_birth_month,c_birth_year,* from TPCDS_SF10TCL.customer limit 3;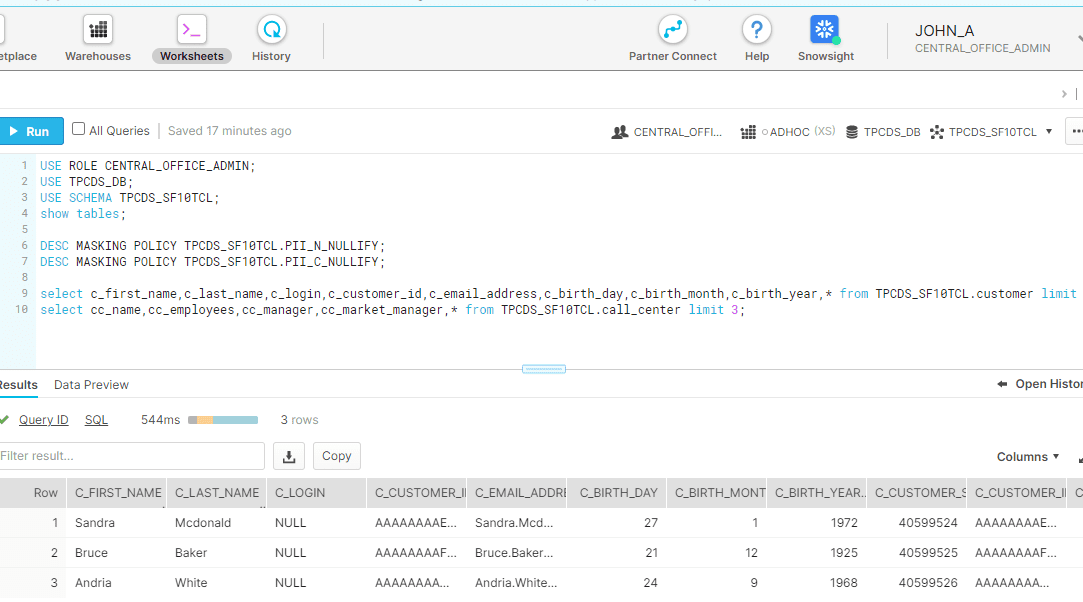
select cc_name,cc_employees,cc_manager,cc_market_manager,* from TPCDS_SF10TCL.call_center limit 3;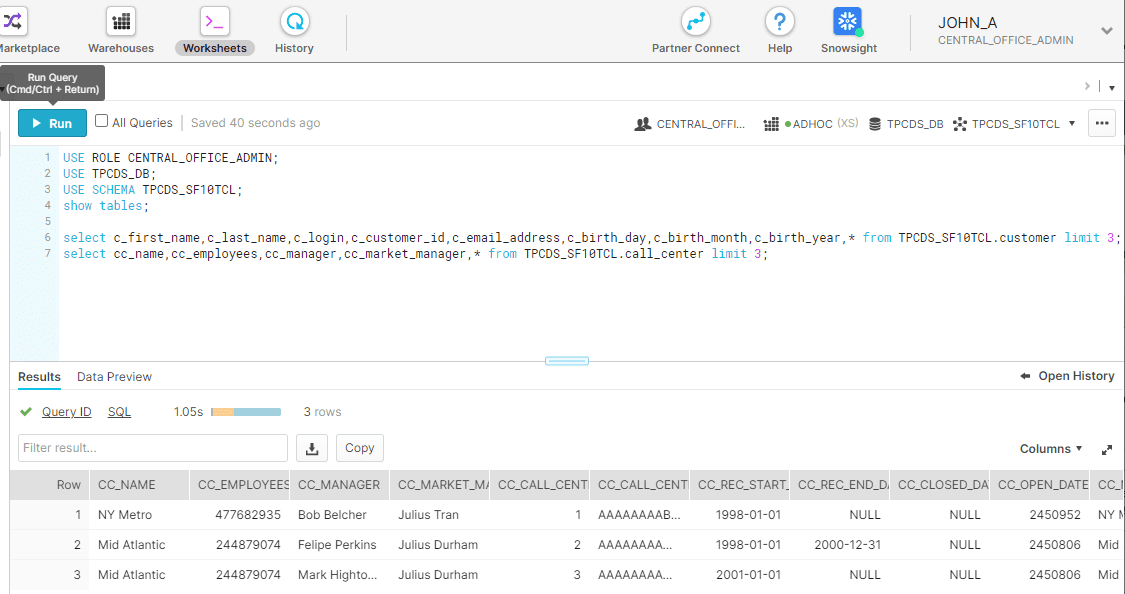
7. Verify that Unauthorized User (CENTRAL_OFFICE role) Can Only See Masked Data
Next, we’ll run the same query logged in as one of our unauthorized users, Jeff or Bill, to ensure they are able to see only masked data. To do this, log in as JEFF_E, click on Worksheets and run the following SQL statements:
USE ROLE CENTRAL_OFFICE;
USE TPCDS_DB;
USE SCHEMA TPCDS_SF10TCL;
select c_first_name,c_last_name,c_login,c_customer_id,c_email_address,c_birth_day,c_birth_month,c_birth_year,* from TPCDS_SF10TCL.customer limit 3;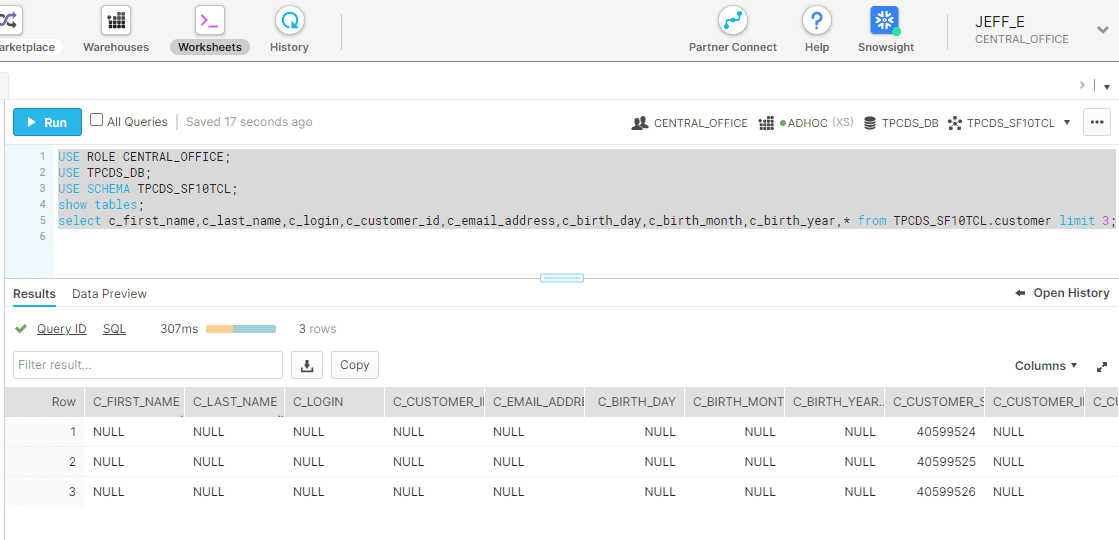
select cc_name,cc_employees,cc_manager,cc_market_manager,* from TPCDS_SF10TCL.call_center limit 3;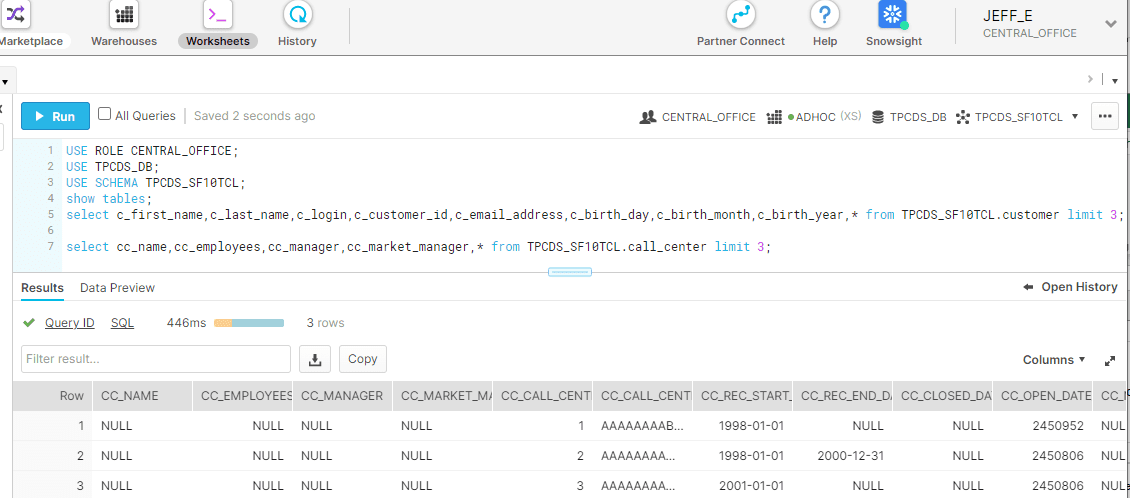
USE ROLE CENTRAL_OFFICE_ADMIN;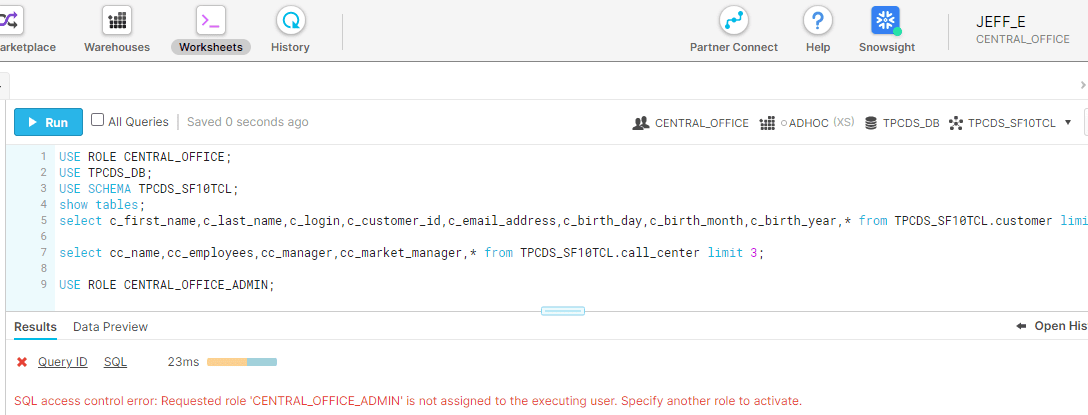
As we can see, our authorized users are able to access unmasked data, but it remains masked for unauthorized users. Now, let’s see how it’s done when Immuta is integrated with Snowflake.
Applying Column-Level Masking Policies with Snowflake + Immuta
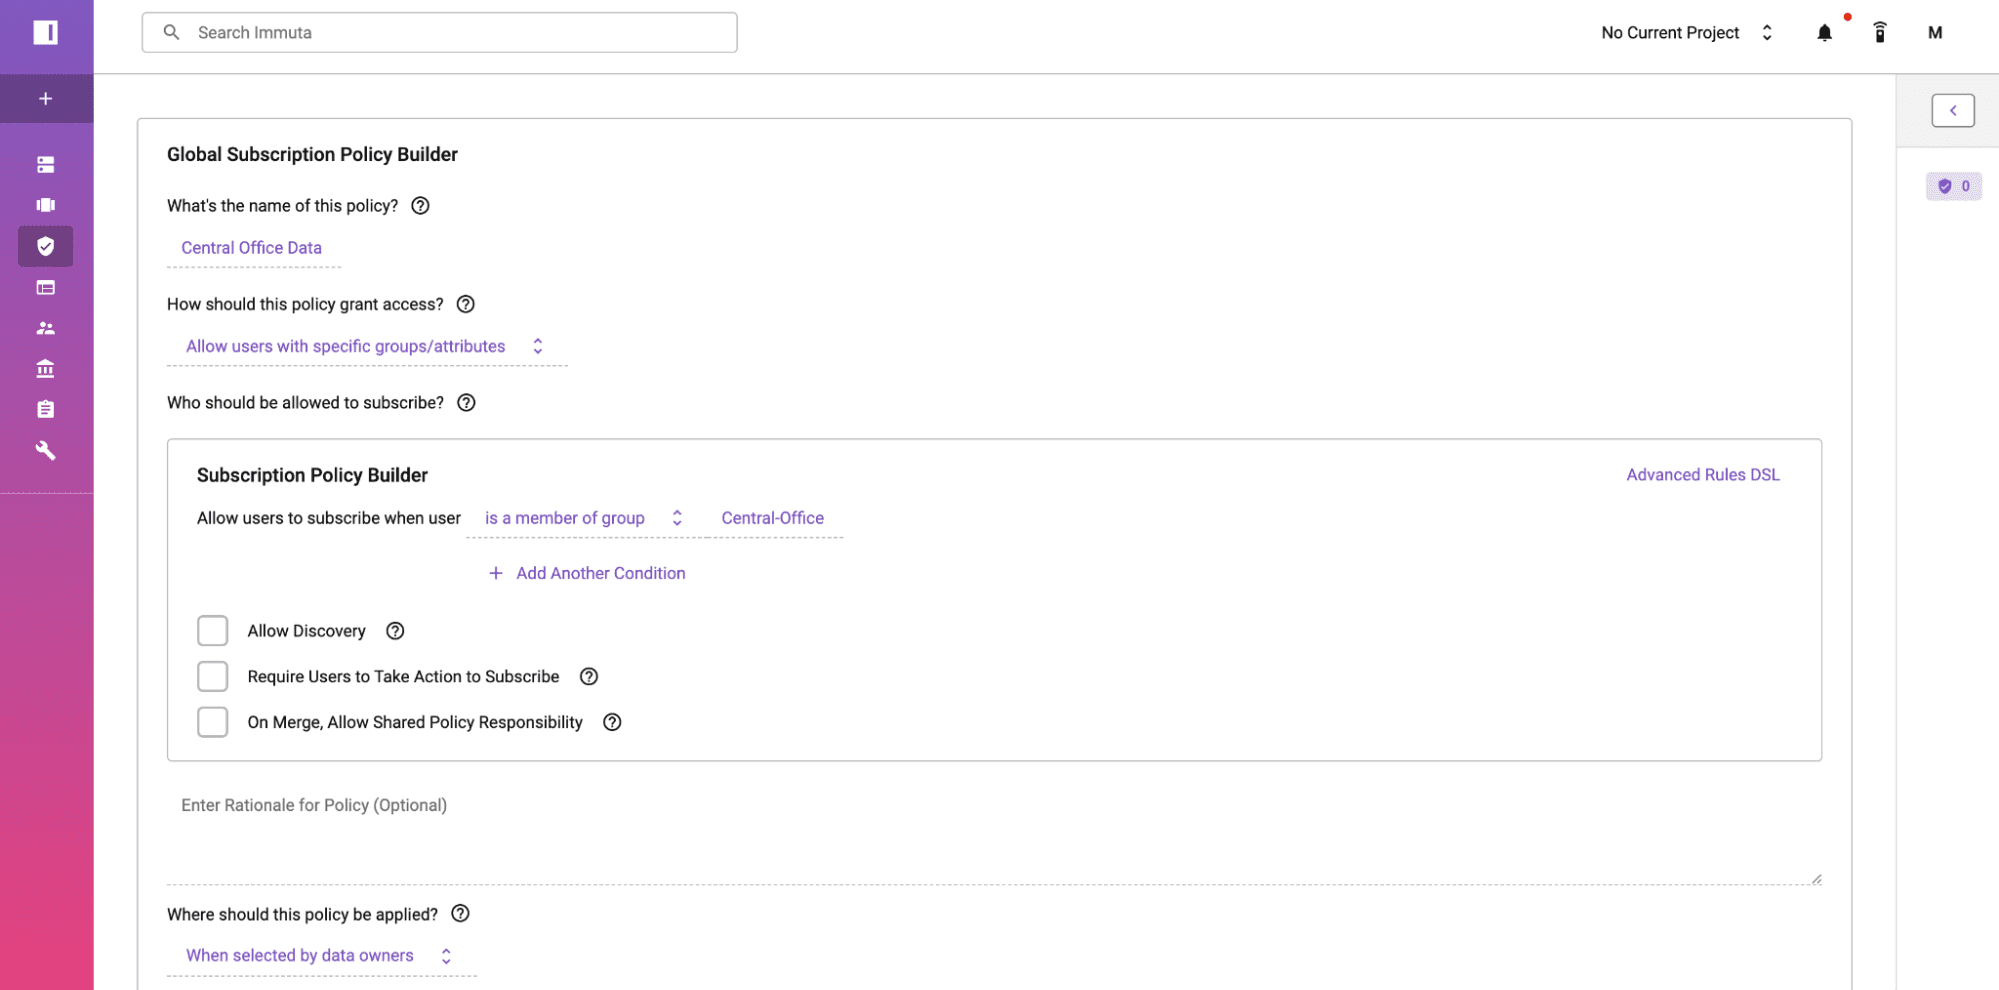
To accomplish the same objective in Snowflake using a single policy in Immuta that implements a dynamic attribute-based access control (ABAC) model, we start by creating a new group for central office employees called “central-office.” Next, we’ll create a global access policy that allows all users in that group to subscribe to the database’s tables.

Immuta’s sensitive data discovery and classification capability automatically tags data containing PII, based on built-in classifiers. Therefore, any Snowflake data registered with Immuta is automatically tagged with Discovered.PII, without any manual investigating or input.
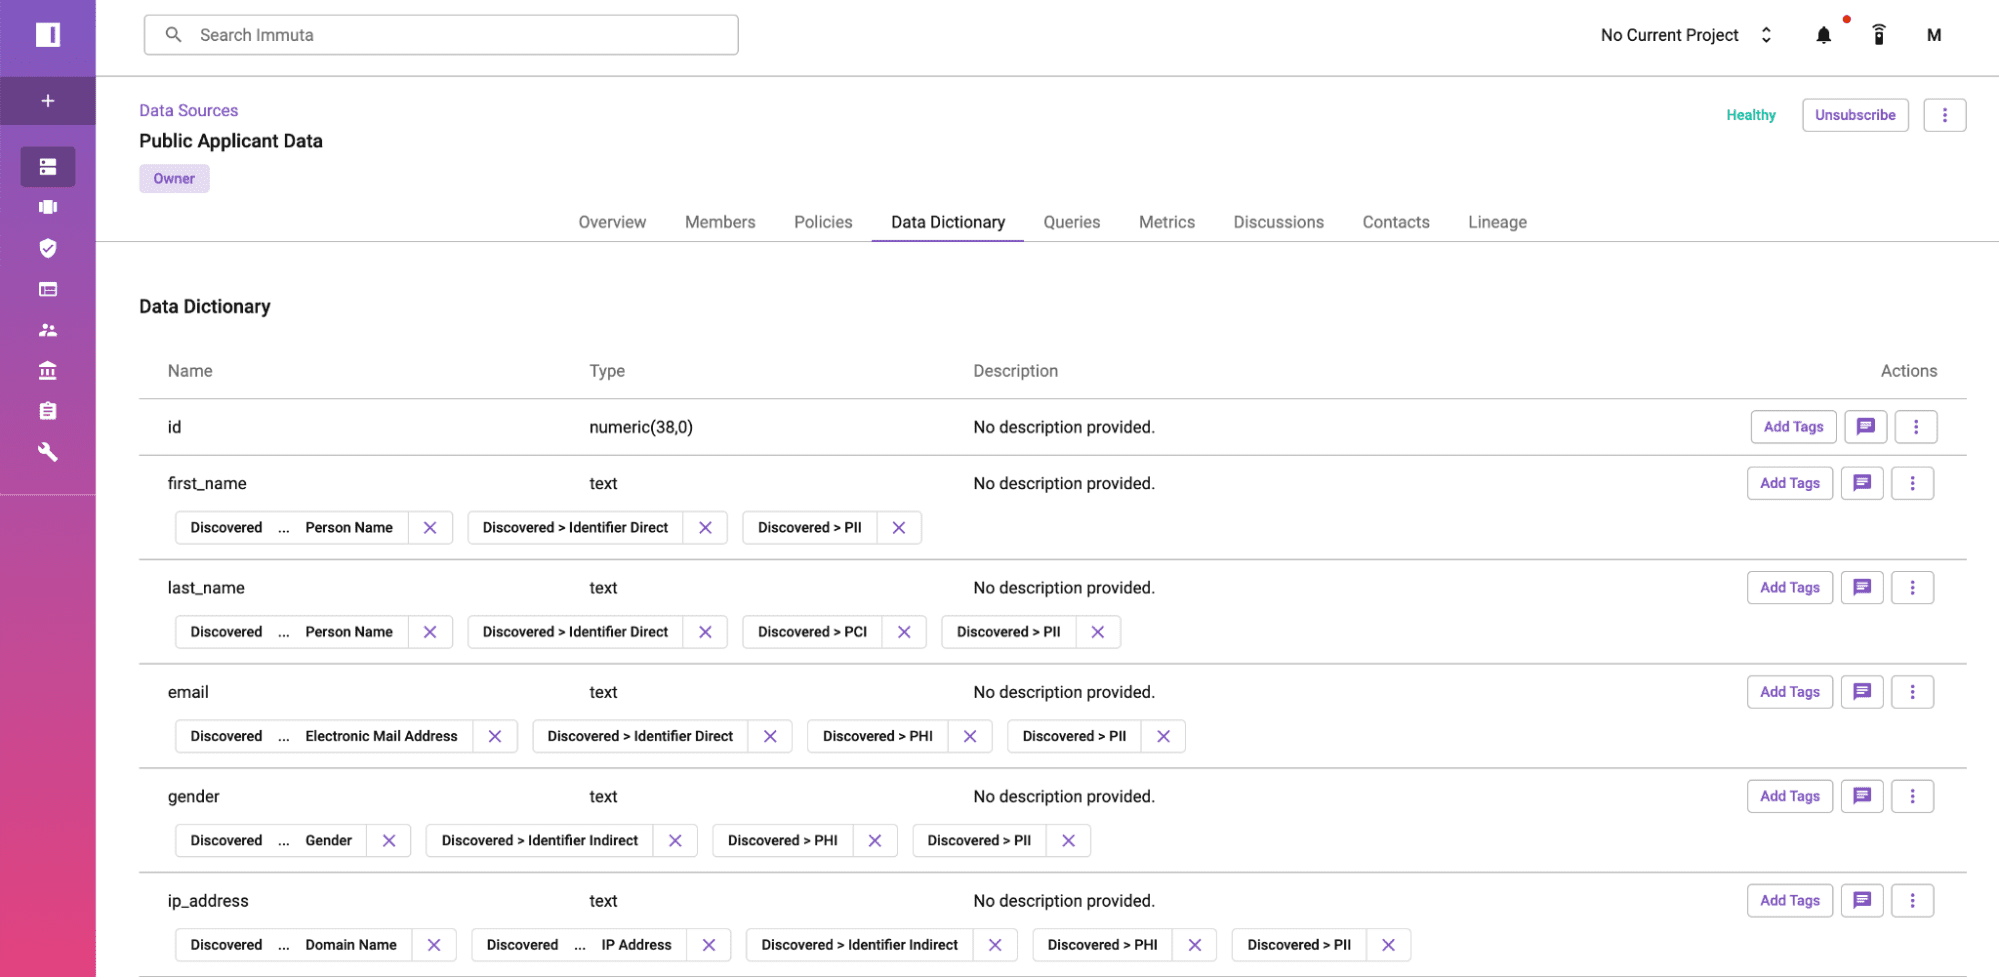
We can now create a user attribute, AuthorizedSensitiveData>All, to override the PII policy. Approaching the authorization this way is akin to allowing people into a party who are on a guest list, instead of trying to determine access based on who’s not on the guest list – which would be an inefficient and error-prone process.
Next, we’ll create a new global data policy that masks all columns with the Discovered.PII tag and has the cell-level data appear NULL, except when a user has the AuthorizedSensitiveData>All attribute.
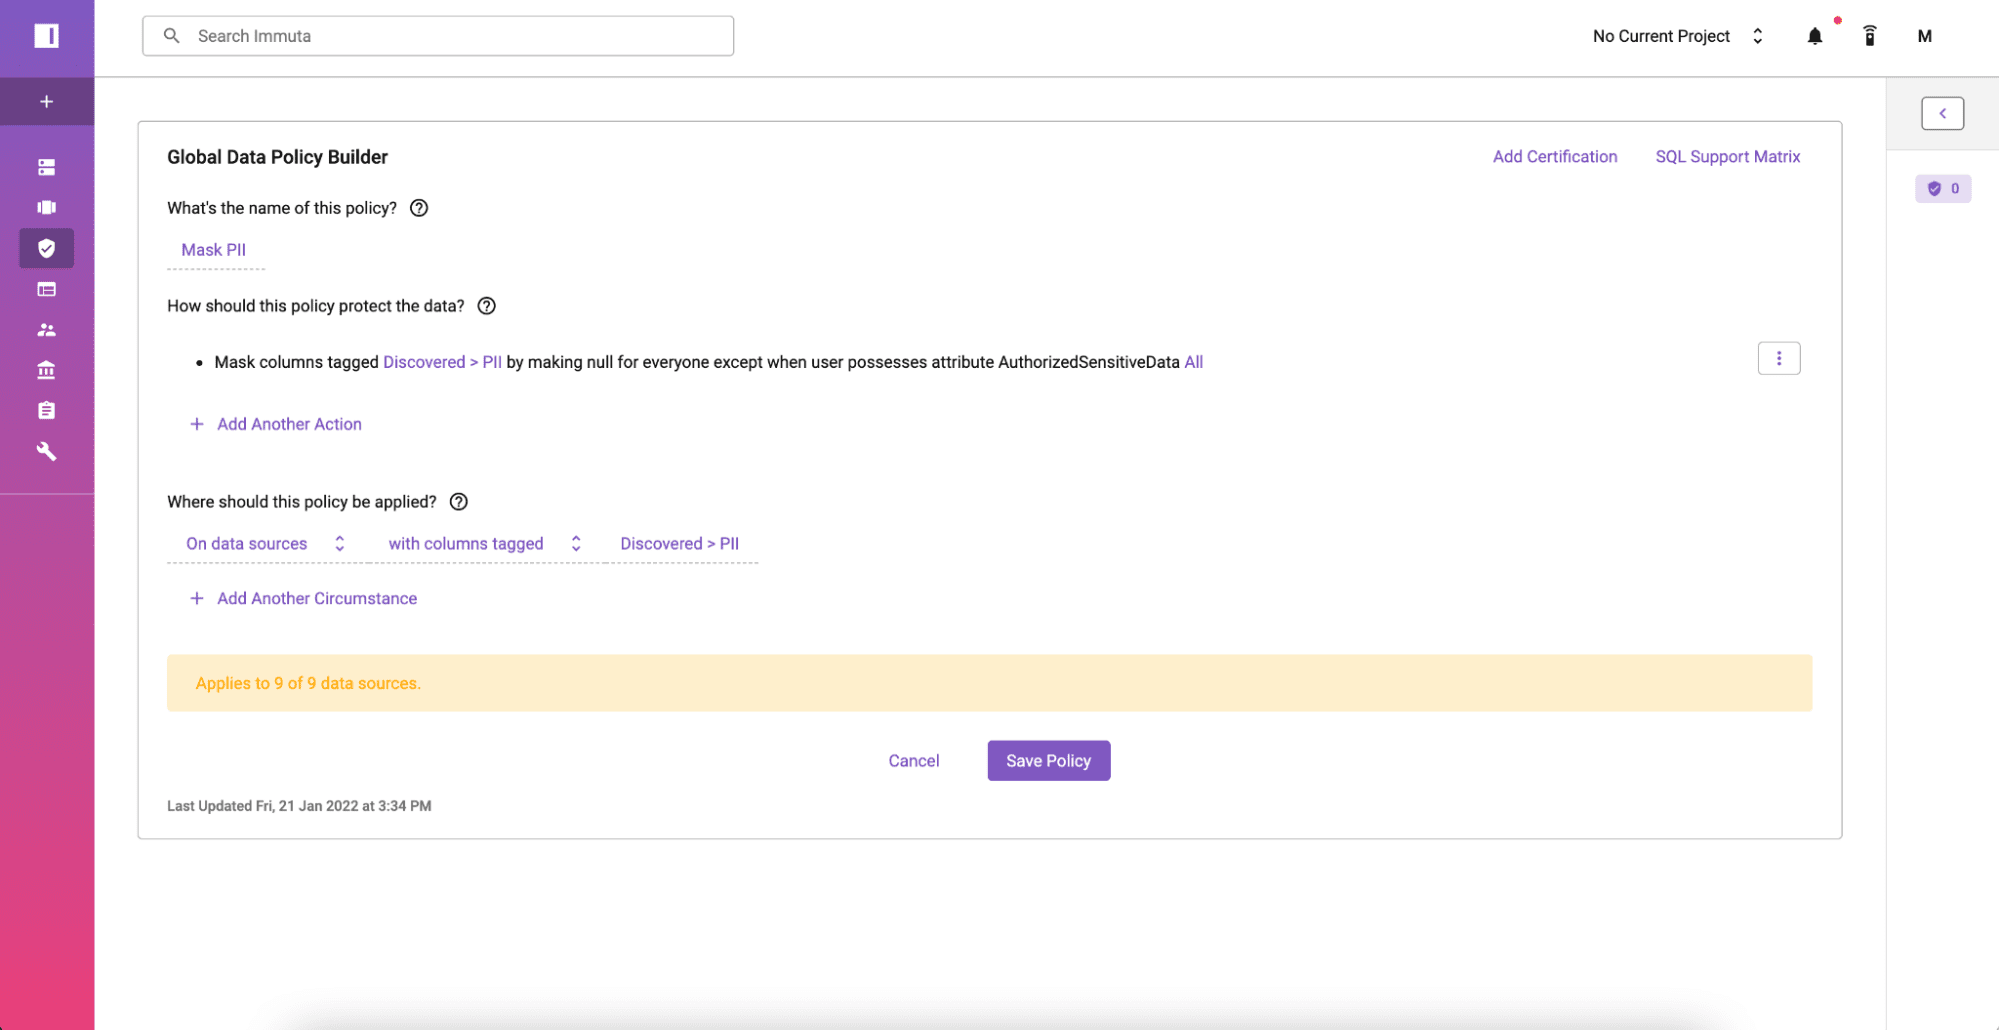
Now, when central office employees with the AuthorizedSensitiveData>All attribute run a query on this table, they will be able to see the unmasked data, while sensitive data will appear as NULL to all other users.
Next Steps for Snowflake Column-Level Security
For Snowflake users leveraging sensitive data, dynamic data access control and data masking capabilities are essential to ensuring the right users can access the right data at the right time, with minimal risk of unauthorized access or noncompliance.
Immuta natively integrates with Snowflake to eliminate the burdens of static, role-based access control, such as manually creating multiple policies and roles, combing new data to identify sensitive attributes, and ensuring that policy enforcement is consistent across platforms. This saves substantial time, vastly reduces risk, simplifies policy management and auditing, and allows data teams to onboard and scale workloads faster. For organizations using Snowflake with Immuta, these capabilities have resulted in $1 million in data engineering savings and reduced time to data access from months to seconds.
Read more customer stories here.